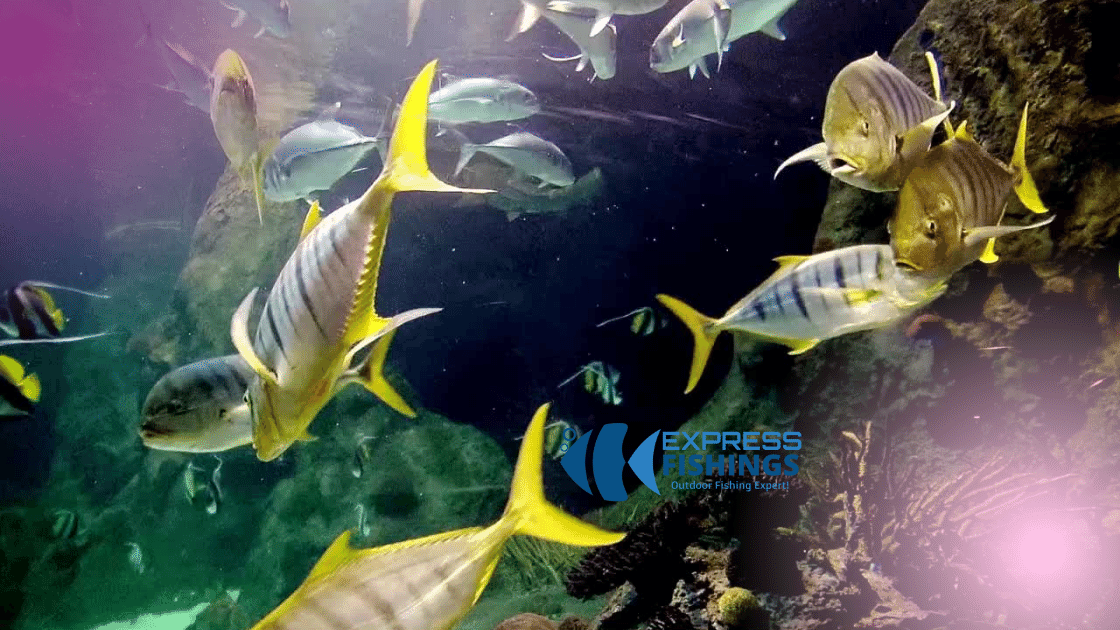
Do you want to find a fish in the river? Do you have a fishing hole that you like to use for your catch-and-release fishing? You can use a fish finder to help you find the fish. There are many different types of fish finders, so it is important that you choose the right one for your needs. In this article, we will discuss the different types of fish finders and how to use them.
What is a Fish Finder?
A fish finder is a device used to locate and identify fish in water. They come in a variety of shapes, sizes, and price points, but all share one common purpose- to help anglers identify and catch fish. Fish finders can be as simple as a handheld unit with a built-in screen or as sophisticated as a full-blown sonar system. Whichever type you choose, the key to using a fish finder effectively is to understand how it works and what its limitations are.
Fish finders use different methods to detect and track fish. The simplest type uses a screen or mirror to display an image of the water’s surface. As you move your boat through the water, the image on the screen updates automatically to show the location of any fish that are detected. This type of unit is easy to use and relatively cheap, but it has two major limitations. First, it can only detect small objects in the water, making it less useful for hunting big gamefish like tuna or salmon. Second, because the unit relies on reflected light from nearby objects to operate, it can be difficult to use in murky or turbid water.
How to Use a Fish Finder?
If you love fishing, then a fish finder is an essential piece of equipment. Fish finders can help you find fish faster and easier than ever before. Here are five tips for using a fish finder the right way.
Where to Place a Fish Finder?
A fish finder is an essential piece of fishing gear for locating and catching fish. The best place to place a fish finder is on the fishing line between the fisherman’s hand and the bait or lure.
Step by Step Guide to Use a Fish Finder
If you’re looking for a fun and easy way to get a glimpse of what’s lurking below the surface of your favorite body of water, consider using a fish finder. This type of device uses sonic waves to detect small schools of fish and other aquatic life.
Here are step-by-step instructions on how to use a fish finder:
- Choose the right device for your needs. There are three main types of fish finders: sonar, magnetism, and light. Each has its own advantages and disadvantages, so it’s important to choose the one that best fits your needs.
- Get familiar with the controls. Each fish finder has different controls, so it’s important to get used to them before you start using the device. The most common controls are a button for turning on the device, a button for changing the frequency range, and buttons for adjusting the sensitivity and viewing range.
- Set up your fishing environment. Before you try to use your fish finder, you need to set up your fishing environment. This means finding out where all the different types of fish live in your area and setting up your fishing environment.
How do fish finders work?
Fish finders use sonar and radio waves to detect objects in water. They come in a variety of shapes and sizes, but all work the same way. You put the fish Finder in the water and point it at the fish you want to find. The fish Finder will then send out sound waves and listen for replies from any fish that are nearby.
Understanding Sonar
Understanding sonar is an essential part of using a fish finder. Sonar transmits sound waves and listens for the echoes that bounce back. By understanding how sonar works, you can use it to locate fish in water.
How to Install a Fishfinder?
Here is a great way to enjoy a day on the water: by using a fishfinder. This simple piece of equipment can help you find fish in both open water and murky waters. Whether you are fishing for trout, bass, catfish or any other type of fish, learning how to use a fishfinder will make your fishing experience more enjoyable.
Fishfinding Features
When you’re out looking for fish, using a fish finder is a great way to increase your chances of success. A fish finder can help you find small, bottom-dwelling fish in murky water or even in deep water. Here are some features to look for when buying a fish finder:
- Range: The range of the fish finder is important, as you want to be able to cover a large area quickly.
- Pulse Width: This refers to how high the frequency of the signal will sweep across the screen. The higher the number, the more detailed the image will be.
- GPS: Many fish finders now have built-in GPS capabilities which make locating specific areas much easier.
- Noise Level: Fishfinders can get quite loud, so be sure to check the noise level before making a purchase.
Fish ID Technology
If you love fishing and want to stay ahead of the curve, then you need to invest in a fish finder. A fish finder is a device that uses sound waves to determine the location of fish in water. They come in all different shapes and sizes, so it can be hard to know which one is right for you. In this article, we will help you choose the right fish finder for your needs.
When shopping for a fish finder, there are several factors to consider. First, what type of fishing are you most interested in? There are three main types of fishing: saltwater, freshwater, and fly fishing. Second, what type of water do you plan on hunting in? There are three main types of water: open ocean, coastal or estuarine, and rivers/streams. Finally, how much money are you willing to spend? Fishfinders range from under $100 to over $1,000.
If you’re just starting out and don’t have a lot of experience with fishfinders, it might be helpful to get a low-cost model. These fishfinders typically use digital sonar technology to scan the water for fish.
Arch Fish Finders
When you are hunting for fish in open water, a fishfinder can be a valuable tool. There are many different types of fishfinders on the market, so it can be hard to decide which one is the best for you. This article will teach you how to use a fishfinder, from setup to using the finder’s features.
First, you need to decide what type of fishfinder you need. There are three main types of fishfinders: sonar, laser, and sounder. Sonar Fishfinders emit sounds that bounce off objects and return as echoes. They are good for hunting small, deep water fish such as bluegills and perch. Laser Fishfinders use a light beam to locate objects. They are good for hunting larger fish like tuna and salmon near the surface. Sounder Fishfinders use acoustic waves to locate objects. They are good for hunting smaller fish near the bottom of the water column.
Once you have chosen your fishfinder type, you need to decide where to buy it and how to set it up. You can buy a ready-made system or build your own with an electronic control box (ECB).
Combination Fishfinders
Combination Fishfinders are the perfect way to cover a large area while still being able to find the fish you are looking for. These units typically have sonar, depth finder and a graphical display that make it easy to see what is below you and where the fish are located.
Single Vs. Dual Frequency
Fish finders can be used in a couple different ways based on the frequency of the signal being detected. A single frequency fish finder uses a single frequency to detect objects in the water, while a dual frequency fish finder uses two frequencies to detect objects more accurately.
There are pros and cons to using each type of fish finder, so it’s important to choose one that best suits your needs. For example, a single frequency fish finder is typically cheaper than a dual frequency fish finder, but it may not be as accurate. A dual frequency fish finder may be more accurate but may also cost more. Ultimately, it’s up to the user to decide what type of fish finder is best for them.
Side Imaging
If you are looking for a great way to find fish in murky water, a fish finder is the perfect tool. Here are some tips on how to use one:
- Choose the right type of fish finder for your needs. There are several different types of fish finders, each with its own unique capabilities. If you only plan on using your finder occasionally, a compact model may be all you need. If you plan on using it more often, consider investing in a more powerful device.
- Prepare your environment before using the fish finder. Make sure the water is clear and free of obstacles, such as rocks or logs. This will help the device properly detect the movement of fish in the water.
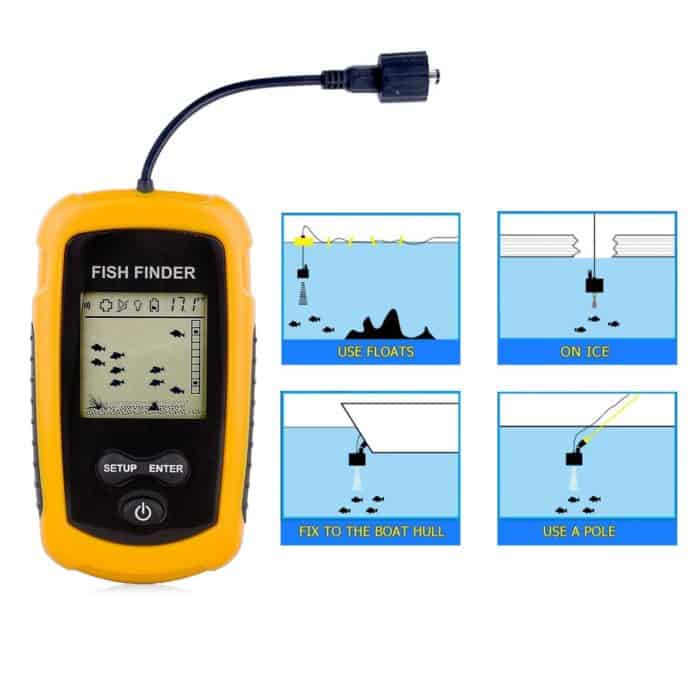
- Insert the antenna into the water and orient the device so that the screen is facing down. Place it so that it’s level with the water surface and close to any obstructions.
- Press the power button to turn on the fish finder and wait for it to initialize. Once initialized, use the navigation buttons to scan around your area for fish activity.
- To view images captured by the device.
You Need to Know Information
When you’re out fishing, one of the most important things you can carry is a fish finder. A fish finder can help you locate specific types of fish in open water or near shore. Here are some tips on how to use a fish finder the right way:
- Know the type of fish finder you have. There are three main types of fish finders: sonar, VHF, and digital. Each has its own advantages and disadvantages for different applications.
- Know where to look. A good place to start when using a fish finder is with nearby structure such as rocks, docks, or boats. Look for schools of small fish near these features and scan the area around them for larger prey such as tuna or salmon.
- Use caution when scanning deep water areas. Fishfinders work best in shallow water that’s less than 100 feet deep, but they can still provide valuable information about fish inhabiting deeper waters if used cautiously. When scanning deep water areas, be sure to keep an eye on your battery life and scan only specific areas that appear to contain prey.
- Plan your route ahead of time.
The Information You See is Not Necessary Directly Below
If you are looking to find fish in a body of water, a fishfinder is the perfect tool. There are a few different types available, so find the one that best fits your needs.
First, determine the type of water you will be fishing in. Some fishfinders work better in salt water, while others work better in freshwater. Once you have determined the type of water, invest in a fishfinder that is specifically designed for your location.
Once you have your fishfinder, follow these basic steps to use it:
- Place the fishfinder in calm water and orient it so the screen is facing downwards.
- Scan the area around you for fish activity. The faster the scan speed, the more detailed the image will be.
- When you locate a fish, press the button on your fishfinder and wait for it to appear on the screen. If there are multiple targets close together, they may be classified as one object and displayed on the screen as such.
Fishfinders Can Locate Other Objects and Have Blind Zones
Most fishfinders have a built-in screen that is able to see a certain range of light, which gives the fisherman an advantage over other anglers when fishing for certain types of game fish. The screen can be set to scan vertically or horizontally and can also be rotated to cover any angle.
When searching for an object, it is important to know the fishfinder’s blind zone. The blind zone is the area around the fishfinder where the signal from the transducer is not strong enough to detect an object. This can be due to obstructions such as rocks, trees or other boats. When in doubt, always scan around your boat before making your cast. Fishfinders are a valuable tool for any angler and provide a very different perspective when fishing for game fish
The scrolling of your Fish Finder does not mean that you or the fish are moving
There are several things you can do to get the most out of your Fish Finder.
Here are some tips:
- Make sure that the Fish Finder is properly level and positioned on the water’s surface; if it isn’t, the unit might not be able to properly “see” the bottom.
- When hunting around rocks, trees or other obstructions, make sure to keep an eye out for fish hiding behind these objects.
- If you’re looking for a specific fish and it’s not showing up on your Fish Finder, try using different frequencies or acoustic modes.
Surface differences are more apparent in thicker, more colorful or dense results
When looking for fish, it’s important to use a good fish finder that can pick up on surface differences. Surface differences are more apparent in thicker, more colorful or dense results. This is why a good fish finder with an ultra-violet light option is ideal for finding fish in murky water.
When you’re out fishing, it can be really frustrating if you don’t catch any fish. Maybe the water is too cold, or maybe the bait isn’t working. In this article, we’ll show you how to use a fish finder to help you find the fish that are hiding in the water.
Fish are Arches
If you’re looking for a fun and easy way to enjoy your outdoors, fishing is the perfect activity for you. Whether you’re a novice angler or an experienced pro, there’s something for everyone to enjoy when fishing. One of the best ways to find and catch fish is by using a fish finder.
There are all sorts of fish finders out there, from simple handheld units to elaborate mountaineering-style gadgets. However, no matter what type of fish finder you choose, the same basic principles always apply. You’ll need to know where to find fish and how to use your finder in order to have success.
First things first: Where do fish live?
Most fishing takes place in bodies of water with aquatic plants and animals – like lakes, rivers and streams. This is where your fish finder comes in handy. Fish use their sense of smell and hearing to locate food sources, so locating these prey items with your finder is a great way to get started.
How do I use my fish finder?
To start using your fish finder, you’ll first need to figure out where the fish are hiding. Look for patterns in the water that correspond
Tips and techniques
When using a fish finder, it’s important to be familiar with the different features and how to use them. This will help you find the fish you’re looking for quickly and easily.
Here are some tips for using a fish finder:
- Select the right mode: The first thing you need to do is select the right mode. There are three modes: sonar, sound, and bottom. Sonar is used to detect objects by sending out sound waves and listening for echoes. Sound mode uses sound waves to detect objects, but doesn’t use echoes. Bottom mode uses both sonar and sound waves to detect objects below the surface of the water.
- Set the sensitivity: Next, set the sensitivity. The higher the sensitivity, the more sensitive the detector is to small objects. If you want to search for large objects, set the sensitivity lower.
- Scan an area: Once you’ve set your sensitivity and mode, start scanning an area. When scanning an area, keep in mind that you need to cover as much ground as possible in a short amount of time. To scan an area, press and hold down the scan button.
Zoom Fish Finder
If you’re like most anglers, you probably spend more time looking at lakes and rivers than you do at the ocean. Even if you do fish in open water, it’s a good idea to invest in a good fishfinder so you can find what you’re looking for quickly and easily. There are a number of different types of fishfinders on the market, but the Zoom Fish Finder is probably the best bet for most anglers. Here’s how to use it:
- Choose your fishing area. The Zoom Fish Finder has a built-in map that shows you where all the fish are located in your chosen area. You don’t need to download any maps or charts; the Zoom Fish Finder does all the work for you.
- Plug in your battery and wait for the unit to initialize (usually takes about 10 minutes).
- Point the device towards your fishing spot and press “Zoom In/Out” until you see an image of what you’re looking for (the image will enlarge or shrink depending on how close it is to the center of the screen).
Tuning Sensitivity
When using a fish finder, it is important to tune the sensitivity to the conditions you will be hunting in. The higher the sensitivity, the more sensitive the device will be to small targets such as fish. However, if the sensitivity is too high, you may miss large targets such as big gamefish. To find the right sensitivity for your hunting environment, try using a low sensitivity setting and increasing it as you become more familiar with the finder’s capabilities.
Localization
Anyone who owns a boat or loves the water can attest to the fact that finding fish is an essential part of any fishing trip.
Fortunately, most modern electronics make locating and catching fish much easier than ever before. In this article, we’re going to discuss how to use a fish finder, one of the most popular electronic devices for fishing.
Fishfinders come in many shapes and sizes, but all of them share one common goal: to help you locate and catch fish in your vicinity. There are two main types of fishfinders: sonar and magnetics.
Sonar fishfinders use a beam of sound to map out the underwater environment. This technology is very efficient at locating large fish, like tuna, but can be less effective at locating smaller fish like sardines.
Magnetics work a bit differently. Instead of using sound waves, magnets send out a magnetic field that can be detected by metal objects (like baitfish) nearby. Because magnetics are more sensitive to small targets, they’re great for catching small fish like trout and whitefish.